
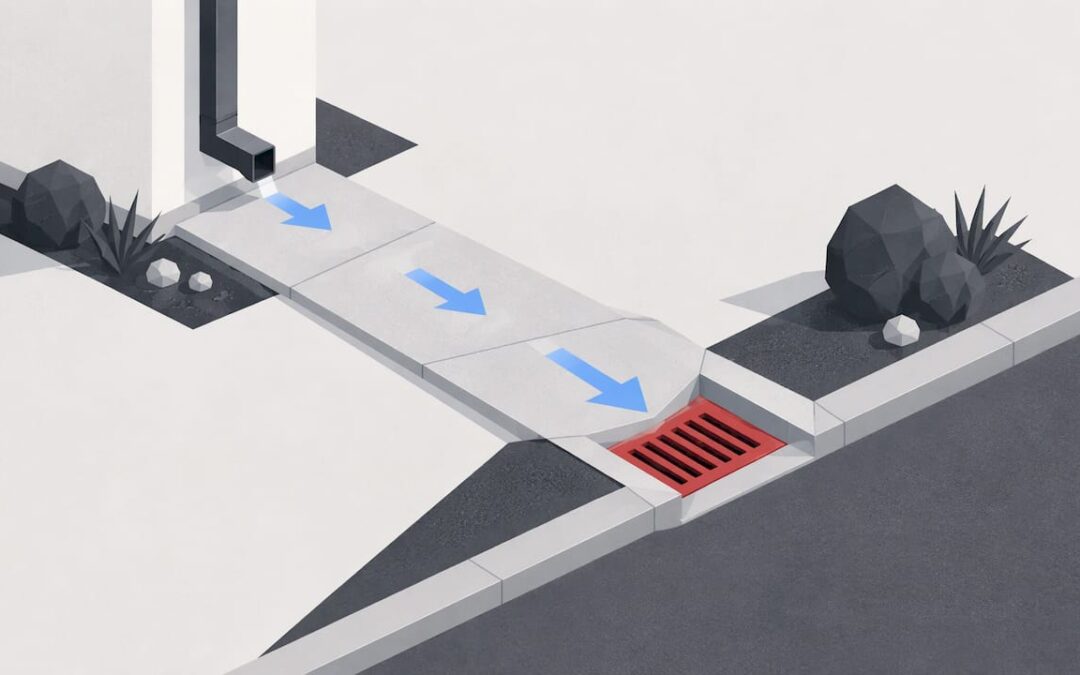
A catch basin is installed at a low point where surface water collects. It sits level on a gravel base, connects to a sloped outlet pipe that carries water away, and has a grate set at grade. The work is simple to describe and easy to get wrong. Basin depth, pipe slope, utility locates and permits decide whether the system drains for decades or floods your yard after the first storm. This guide walks through each decision, so you know what a proper installation includes and what to ask for when you hire it out.
TL;DR
- Put the basin at the lowest point of the problem area, or near downspouts, driveways and the bottom of slopes, where it stays reachable for cleaning.
- Call 811 before any digging. Colorado law requires a locate request at least three business days before you dig.
- The pipe needs a steady fall of at least 1%, about 1 inch per 8 feet, and the grate should sit just above or at the surrounding grade.
- Permits depend on your city, and connections to a municipal storm system are the most likely to need one.
- Most clogs trace back to grate debris, sediment in the sump or too little slope, so cleaning after heavy storms keeps the system working.
Table of Contents
- What a catch basin does
- Where to place a catch basin
- Utility locates and permits
- How catch basin installation works, step by step
- How deep should a catch basin be?
- What affects the cost of replacing or installing a catch basin
- Why catch basins clog, and how to clear them
- Hiring a crew for catch basin installation
- Get a catch basin installed in Denver
- FAQ
- Sources
What a catch basin does
A catch basin is a receptacle under an opening in the ground. Surface runoff enters through a grate, larger debris stays at the grate, and sediment settles in a sump below the outlet pipes. Michigan’s environmental agency describes this exact function: the basin collects runoff and the sump gives basic pretreatment by letting sediment drop out before water moves downstream.
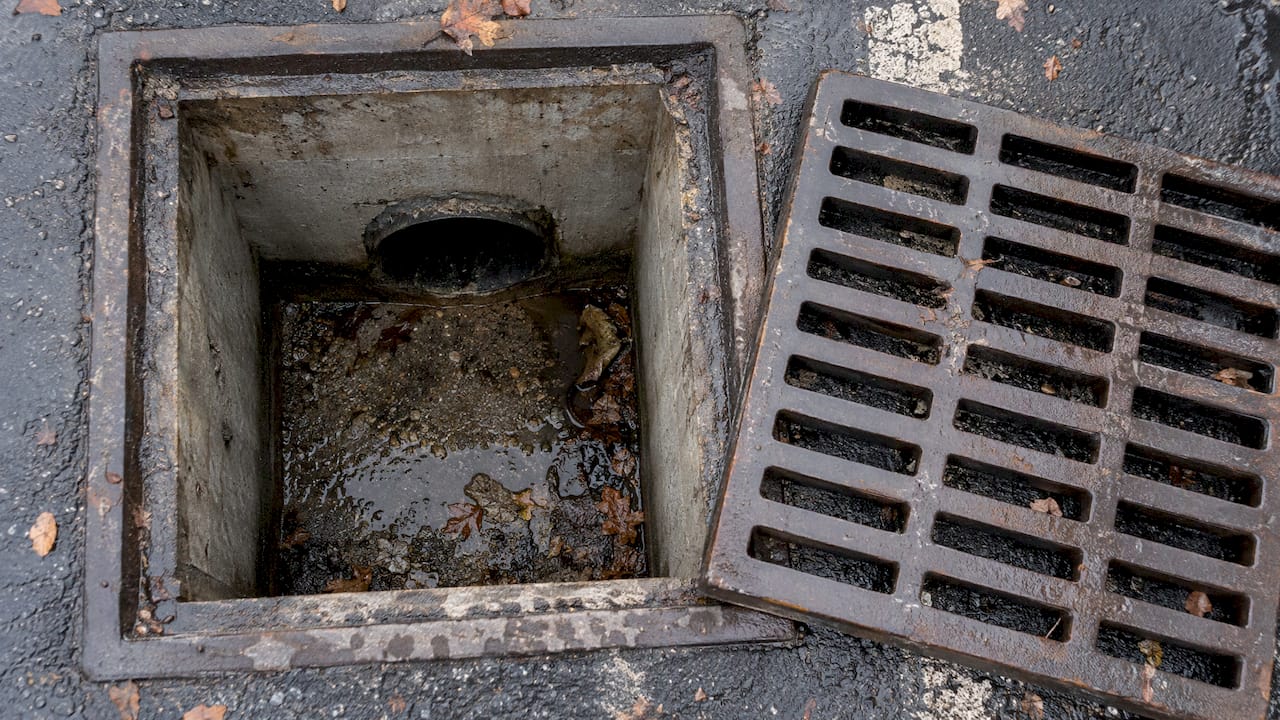
Two parts work together. The basin is the collection point. The pipe attached to it is the conveyance that moves water to a discharge location such as a storm sewer, a street outlet or a daylight point on the lot.
Catch basin vs. sump
People often mix these up. A catch basin takes surface water in through a grate and routes it to an underground storm pipe. A basement sump collects groundwater from the soil or from drain tile around the foundation. A sump pump is a powered device that lifts that water out. The City of Edmonton draws the same distinction in its lot grading guide. So if water pools in the yard or on a parking lot, you want a catch basin. If water seeps into a basement, you have a different problem.
Where to place a catch basin
Placement matters more than the hardware. In storm sewer design, basins belong at low points, and elsewhere they are spaced so surface runoff has somewhere to go before it ponds.
On a residential lot, the common spots are the ones NDS lists: the bottom of slopes, near downspouts, along driveways and in low-lying areas of the yard. The basin should stay accessible so you or a crew can reach it for cleaning.
A few practical rules we apply on Denver properties:
- Find where water actually stops. Watch the yard or lot during a hard rain. The place water lingers after the rest has drained is the true low point.
- Plan the discharge first. The outlet pipe must have somewhere lower to go. If the only discharge is higher than the basin, the layout needs rethinking, or grading work needs to come first.
- Keep it out of traffic paths when you can. Where vehicles will cross, the grate and base need heavier-duty construction.
- Consider the downspouts. Roof water is a large share of what lands in a yard. Tying downspouts into the system, or placing a basin near them, protects foundations and walkways.
On larger commercial and municipal sites, placement also follows site grading and the stormwater plan, which is why basin work often goes together with grading and excavation.
Utility locates and permits
Call 811 first
Before any trench is cut, locate buried utilities. NDS tells installers to call 811 to mark gas, electric, water and telecommunications lines. In Colorado, the state’s locate service says you must contact it at least three business days before digging, whatever the size of the project. The service is free, and wait for all utilities to respond before breaking ground.
When a permit applies
Permit rules are local. The general guidance is to check local building codes and HOA guidelines, because requirements vary and some municipalities require permits for connections to municipal storm systems. Cities show how different the rules are:
- Houston requires a plumbing permit for catch basin or outside area drain plumbing, with a registered master plumber, plan review and inspection.
- Los Angeles requires a Storm Drain Connection Permit for connecting a property to the city storm drain system.
- Riverside, California requires a construction permit for catch basins or drain pipe in a street, alley or easement, with approved plans and a licensed contractor.
- Breaux Bridge, Louisiana requires permits before drainage structures go into the public right-of-way, and the city engineer sets culvert size, grade and elevation.
The pattern is consistent: a basin that stays on private property and drains onto your own lot is the least regulated, and anything that touches the public right-of-way or a city storm line is the most regulated. Check with your city or county permitting office before you commit to a layout. If you hire a contractor who handles permitting as part of the job, that step is off your plate.
How catch basin installation works, step by step
The sequence below follows the manufacturer installation guidance in the research, and it matches how a careful crew works.
1. Mark the layout and dig
After the locate, mark the basin position and the pipe route. Excavate the basin hole and the pipe trenches. The hole needs to be deep enough that, after 3 to 4 inches of compacted stone or gravel goes in the bottom, the basin outlets line up with the bottom of the trench. Risers or a low-profile basin bring the grate up to grade when needed.
For stormwater-rated basins, Orenco’s instructions call for a 6-inch compacted aggregate or pea-gravel bed. Follow the instructions for the specific product you are setting.
2. Build the base and set the basin
A level, compacted base keeps the basin from tilting or settling. Set the basin level, and orient the inlets and outlets so they face their trenches. Orenco also requires the inlet and outlet piping to be aligned with the trenches before the pipes are glued to the basin.
3. Connect the pipe and hold the slope
Water only moves if the pipe falls. NDS recommends at least a 1% slope from the basin to the discharge point, which it describes as a 1-inch drop per 8 feet of pipe. Another installation reference gives outlet fall as about 24 inches per 100 feet, roughly 1/4 inch per foot, a steeper figure that is easier to build with and gives you margin. On a long run, a steeper fall moves sediment better.
The pipe network should have no humps, because any high spot holds water and collects silt. Corrugated pipe can snap into the basin adapter, and PVC can be press-fit, depending on the product.
4. Test before you bury
Run water through the system and check flow direction and leaks before final bonding or backfill. Tempo’s guide calls for this test. Finding a leak now takes minutes. Finding it after the sod is down means digging again.
5. Backfill in layers
Backfill in lifts, compacting as you go. Orenco directs installers to backfill around the basin and piping in 6-inch lifts, to avoid sand and unsuitable native material, and to use clean rounded gravel, crushed stone or pea gravel where the native soil is poor. Denver’s clay soils are the case where this matters most, since clay holds water and shifts as it wets and dries.
6. Set the grate to grade
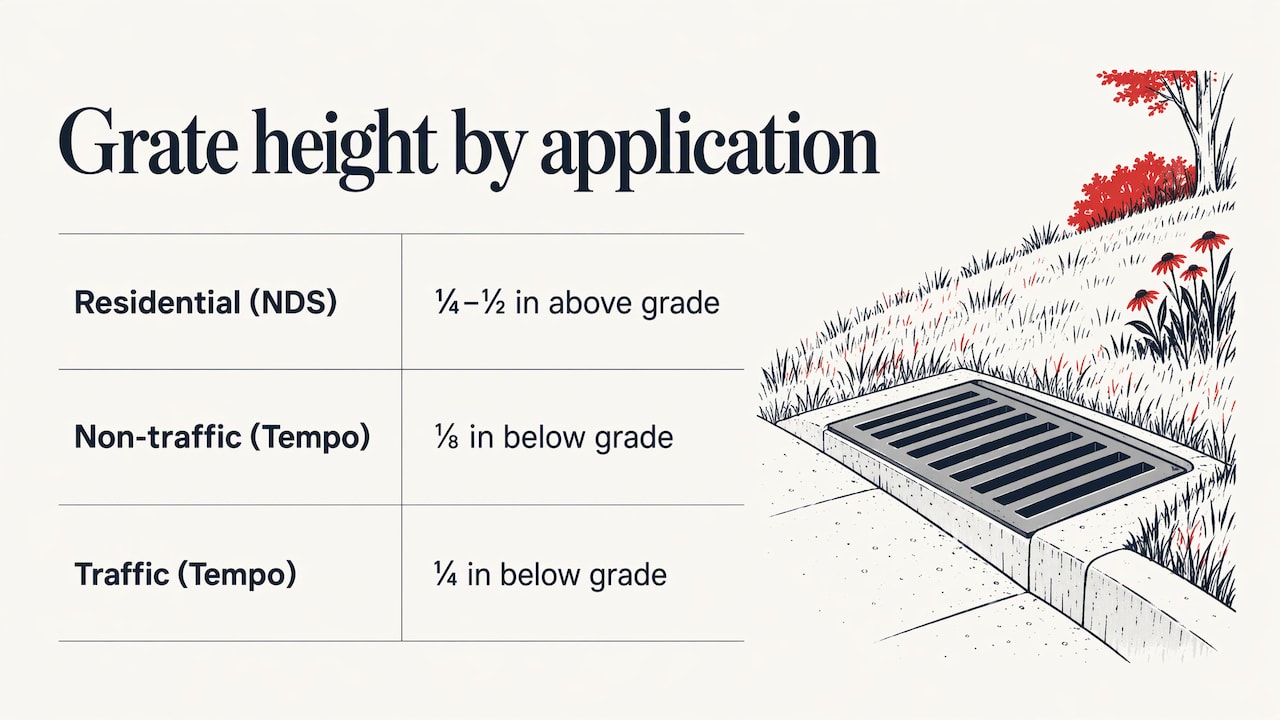
The finished grate sits slightly above the surrounding ground so water flows toward it. NDS gives about 1/4 to 1/2 inch above grade for residential work. Tempo’s guide gives a different figure for its products: non-traffic grates about 1/8 inch below grade and traffic grates about 1/4 inch below, and says heavier-duty applications may need concrete encasement. The right number depends on the product and the surface around it, so follow the manufacturer’s instruction for the basin being installed and finish the surrounding grade so it drains toward the grate.
How deep should a catch basin be?
There is no single depth. For a yard drain, the basin depth follows the pipe: the outlets must line up with the trench bottom, and the sump must sit below them to catch sediment.
For engineered stormwater work, Connecticut’s environmental agency states that sump depth should be at least four times the outlet pipe diameter, and deeper where cleaning is infrequent or sediment loads are high. Its cited municipal design uses a 4-foot basin diameter with 4 feet from grate to basin bottom. A residential plastic basin is far smaller, but the principle holds: a bigger sump means longer between cleanings.
Pipe depth is the second question. Frost matters in Colorado, and so does cover over the pipe where vehicles drive. Your installer should set the pipe depth based on the discharge elevation, the traffic load and local requirements.
What affects the cost of replacing or installing a catch basin
Costs vary too much for a single national number to be useful, and a figure from a different region or a different soil type will mislead you. What moves the price on a given site is consistent:
- Basin type and size. Plastic residential units, precast concrete structures and cast-in-place concrete structures sit in very different ranges. Our cast-in-place concrete storm structures suit sites that need a custom size or heavier loading.
- Excavation. Depth, trench length, rock, clay and access for equipment all change the hours.
- Pipe run and discharge. A short run to a nearby outlet costs less than a long run to a storm connection.
- Surface restoration. Concrete, asphalt, pavers or landscaping that has to be cut and replaced adds to the total.
- Permits and inspections. Public right-of-way work can add fees and scheduling.
- Replacement vs. new. Replacing a failed basin may mean removing the old structure and repairing the pipe it was attached to. A video inspection before the job shows the pipe’s condition, so the quote covers what is actually there.
The most reliable way to get a number is a site quote after someone has looked at the grade, the discharge and the soil.
Why catch basins clog, and how to clear them
The causes are predictable. NDS lists debris on the grate, sediment in the basin or pipes, outlet blockages and insufficient slope. Its clearing steps follow the same order:
- Remove debris from the grate.
- Clear sediment from the sump.
- Snake the outlet pipe if water still backs up.
- Inspect connections for settlement, damage or roots.
- Maintain the grade around the basin so water keeps flowing to it.
Sediment is the quiet culprit. The sump traps what passes the grate, and a sump that has filled leaves nowhere for the next load. One installation reference says to clean the sump periodically and after heavy storms, especially where mulch, leaves, sand, silt or grass clippings are present. Minnesota’s pollution control guidance, written for inlet protection, advises inspecting after each rainfall and investigating significant ponding. It also says to clear frozen inlets manually or with steam, never with salt.
Keep yard waste out of drains too. A levee district in Texas notes that leaves and debris clog storm drains and cause street pooling, and asks residents not to blow or rake clippings into the street or the drains.
If water still backs up after the basin is clear, the blockage is likely farther down the line. That is when hydro jetting and a camera inspection find what a snake cannot. Our drain cleaning and hydro jetting work covers that.
Our perspective on catch basin work
We see the same pattern on Denver jobs. A basin goes in quickly, the slope is a little short, nobody has checked the discharge, and a year later the owner is back with standing water. Guessing is expensive. The basin itself is rarely the weak point. The grade, the pipe fall and the connection to where the water ends up decide the result.
That is why we handle a project as a whole, from permits to cleanup. The same crew that locates, excavates and sets the structure also connects the pipe, tests the flow, backfills and restores the surface, so nothing falls between trades. For sites where the answer is a larger structure, we work with storm inlets and detention systems, and for broad paved areas a trench drain is often the better collector.
Denver’s climate adds its own demands: heavy summer downpours, freeze and thaw cycles, and clay soil. Designing for those conditions at the start costs less than redoing the work later.
Scott
Hiring a crew for catch basin installation
If the job touches a street, an alley, a municipal connection or a commercial lot, hiring it out is the practical route. Cities such as Riverside already require approved plans and a licensed contractor for work in the public right-of-way. Ask any crew you consider:
- Who calls 811 and handles permits?
- How will the pipe slope be verified?
- What gets tested before backfill?
- How will the surface be restored?
- Who do you call if it fails to drain?
For commercial properties, drainage connects with other systems. Parking structures need their own approach, and we cover that under parking garage storm repair and replacement. Larger development and site work falls under our civil work.
Get a catch basin installed in Denver
We install and replace catch basins and storm drainage for homeowners, businesses, developers and municipalities across Denver. Our turnkey approach covers the locate, permit, excavation, pipe connection, flow testing, backfill and cleanup, with a 24/7 emergency line when a drainage failure cannot wait.

Tell us where the water collects and we will plan the system around it. Start with our excavation and grading services, or reach us through the Pipexnow homepage for a quote.
FAQ
Where should I put a catch basin?
Place it at the lowest point of the area that floods. Near downspouts, at the bottom of slopes and along driveways are common spots. Make sure it stays reachable for cleaning and that the outlet pipe has a lower place to discharge.
How much does it cost to replace a catch basin?
The price depends on basin type, excavation depth, pipe length, surface restoration and permits. Replacement can also include pipe repair. A site visit is the reliable way to price it, because soil and discharge location vary from lot to lot.
How deep does a yard drain need to be?
Deep enough that the basin outlets line up with the pipe trench, with a sump below the outlets and a continuous downhill fall of at least 1%. Pipe depth also depends on frost, traffic loads and local rules, so your installer should set it for your site.
Do I need a permit to install a catch basin?
Often yes, especially when the work connects to a city storm system or touches the public right-of-way. Rules differ by city and HOA. Call 811 before digging in every case, and check with your local permitting office.
How do I clear a clogged catch basin?
Remove debris from the grate, clear the sediment from the sump, and snake the outlet if water still backs up. Check the connections for settlement, damage or roots. If the clog returns, a camera inspection can find the cause farther down the pipe.
Sources
- Colorado 811, Colorado Utility Locator
- Michigan EGLE, Catch Basin
- NDS, How to Install a Catch Basin
- City of Edmonton, Homeowner’s Guide to Lot Grading and Drainage Issues
- City of Houston permitting
- Los Angeles Storm Drain Connection Permit
- Riverside Public Works Permitting
- Breaux Bridge Culverts and Catch Basin Application
- Tempo Drainage Installation Guide
- Orenco Stormwater Catch Basin Installation Instructions
- Introduction to Area Drainage
- Connecticut DEEP, Catch Basin design
- Grass Clippings and Leaves, Fort Bend County LID